It’s a new year and many chiropractors are evaluating what will enhance their respective practices, particularly as it relates to their bottom line. One of the most common questions I get is: “Do I need to be credentialed to bill insurance, and what are the best plans to join?” It’s a loaded question – but one every DC ponders. Whether you're already in-network or pondering whether to join, here's what you need to know.
Think Outside the Box and Spine (Part 6): Shoulders and Elbows
During the course of this series of articles, of which this is the sixth and final installment, I have enjoyed teaching you about the kinematic chain from the ground up: feet, ankles, knees, hips, wrists and hands. From the beginning, I have tried to paint a clear picture of how biomechanical problems that begin in the extremities can affect the entire axial kinematic chain clear up to the head. I hope you have found the journey insightful and useful for your practice thus far.
Now, our focus shifts to the shoulders and elbows. We all realize how important these upper extremity areas are and we experience this on a daily basis in the patients we treat. In the Oct. 7, 2011 issue of DC, I wrote an article called "Shoulder Pain: Practical Tips for Examination and Treatment." I went into specific details in a discussion on the shoulder that we will not delve into for this article. Here, let's specifically address the major misalignment patterns and concepts to keep in mind when treating your patients.
The Shoulder
The shoulders are an extremely common area in which to have pain and dysfunction. Frequently we see patients who have come from some other type of health care practitioner. Orthopedists, neurologists and physical therapists are a few of the health care providers who treat a the lion's share of shoulder maladies.
Shoulder pain manifests itself in confusing ways. Patients can have pain from the shoulders move into their arm, upper back, mid-back and/or neck. Headaches can eventually start as well (because of the trapezius muscle insertion into the skull). Lingering cervicothoracic pain that is not going away is a good indicator of shoulder problems. You need to be checking this.

In our society, most health care providers and patients are solely focused on "single-incident trauma" or "What just happened to you? How did you hurt yourself?" Practice teaches us that more often than not, our patients do not know how they came to have pain. Some patients are able to identify specifically how they were hurt, but for many more, the pain develops over time for various reasons or no perceived reason at all. This is where your detective skills come into play.
There are quite a few classic conditions involving the shoulder; frozen shoulder, impingement syndrome, bursitis, capsulitis and tendonitis are some of the major ones. The unifying theme with almost all shoulder conditions is the fact that the shoulder joints are misaligned. Without getting them into a better position through adjustments, rehabilitation will be hampered.
Shoulder Anatomy, Subluxation Patterns and Adjustments
Most of your patients do not understand that the shoulder joints consist of more than just the ball and socket. In fact, a lack of understanding and treatment of the other joints of the shoulder will not bring about healing as quickly. As we review the shoulder girdle joints, picture yourself or your patient slumping forward into bad posture. This gives you a feeling and a visual of how these joints will misalign.
Glenohumeral ((shoulder) joint: A multi-axial synovial ball-and-socket joint between the glenoid fossa of the scapula (shoulder blade) and the head of the humerus (upper arm bone). A shallow socket, it requires the presence of a fibrocartilaginous labrum to aid in support. The glenohumeral joint subluxates anterior - inferior (AI). The appropriate adjustment is anterior to posterior, inferior to superior. (Figure 1)
Acromioclavicular (AC) joint: The junction between the acromion process and the distal clavicle. The AC joint allows the arm to be raised above the head. It is a gliding synovial joint that acts as a pivot point for movement of the scapula. When the AC joint subluxates, the distal clavicle moves superior. Adjust the distal clavicle superior to inferior (S to I). (Figure 2)

Sternoclavicular (SC) joint: A synovial joint composed of the sternal end of the clavicle and the upper and lateral part of the cartilage of the first rib. They are separated by an articular disc. When this joint subluxates, the proximal clavicle moves superior, anterior, medial (SAM). Adjust the proximal clavicle posterior-inferior-lateral (SAM to PIL). (Figure 3)
Scapulothoracic joint: This is actually more commonly referred to as an articulation rather than a true joint. It is formed between the anterior scapula and the posterior thoracic ribs 2-7. The musculotendinous attachment to the skeleton is formed by the trapezius and serratus muscles. In terms of subluxation, an external rotational pattern is common, as they follow the shoulder anteriorly. Internal rotation pattern is possible. Use your motion palpation and movement patterns to find out. Adjust from external rotation to internal rotation. (Figure 4)
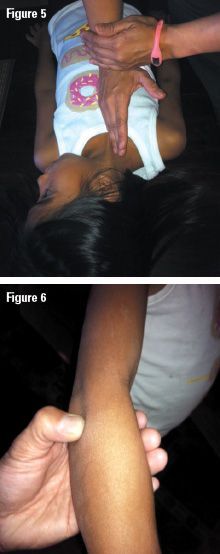
Rib joints (costovertebral, costotransverse and costosternal): Costotransverse joints are synovial and involve the facets of the tubercles of ribs 1-10, forming joints with the corresponding thoracic vertebrae. They are present in ribs 1-10. The costovertebral and costotransverse joints are found posteriorly, also in ribs 1-10. Ribs 11 and 12 are floating. The subluxation pattern for both anterior and posterior ribs is superior. Adjust superior to inferior on the rib head (S to I). (Figure 5)
The pictures above have the patient lying supine. In this case, you can use the drop table or apply directional pressure with your fingers to gently move the bone. If you don't have a drop table, use a speeder or toggle board as a portable drop piece. You can also pull out your spring-loaded instrument and place the tip on the appropriate bone in the correct direction.

Most of us learned traditional manual adjustments for the shoulder as taught in school. These methods do work. I caution you to make sure you are careful with how much force you use, as the shoulder joints are often tender and patients have a tendency to tighten up. The bottom line is to do what works for you and use the methods I discussed above to add to your tool belt.
The Elbow
Last, but not least, is the elbow joint. It is a synovial hinge joint between the humerus in the upper arm, and the radius and ulna in the forearm, allowing the hand to be moved toward and away from the body. The radioulnar joint shares joint capsule with the elbow joint, but plays no functional role at the elbow. The elbow region includes the olecranon process and the lateral and medial epicondyles.
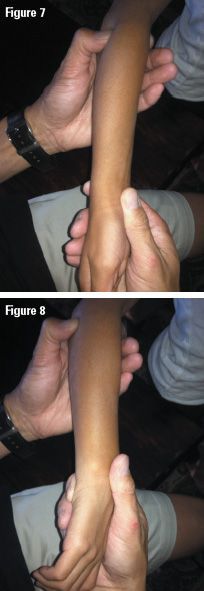
The elbow joint moves through flexion, extension, supination and pronation. The pain felt here is often due to overuse, as well as biomechanical dysfunction of surrounding bones. We see ailments like medial and lateral epicondylitis (golfer's and tennis elbow) and bursitis, to name a few. Misalignments of the elbow region involve the radial head and the olecrenon process. (Figure 6)
Subluxation Patterns and Corresponding Adjustments
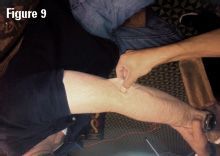
Radial head in pronation: Support the mid-forearm with the inferior hand. Gently grasp the elbow with the superior hand, placing the thumb on the radial head and the fingers wrapping around to the front of the elbow. Passively rotate the forearm from pronation to end range of supination and thrust gently. Often a "pop" can be heard. (Figure 7)
Radial head in supination: Same setup as above, except in this case, you rotate the forearm from supination to pronation and thrust gently. (Figure 8)
Olecrenon posterior: Inferior hand is on the forearm, and the contact hand has the thumb, index and middle fingers contacting the olecrenon process. Now you are moving the forearm into extension. Do not go to full extension! Leave a slight bit of flexion in the elbow as you thrust gently on the olecrenon process. (Figure 9)
As I discussed in my previous article on the wrist/hand (part 5 of this series), if you find elbow issues, always check the shoulders and neck. They are usually linked.
That brings us to the end of our comprehensive look at the extremities. I hope you have gleaned some tidbits you can use in your practice to help your patients. Feel free to contact me if you have any questions.


